
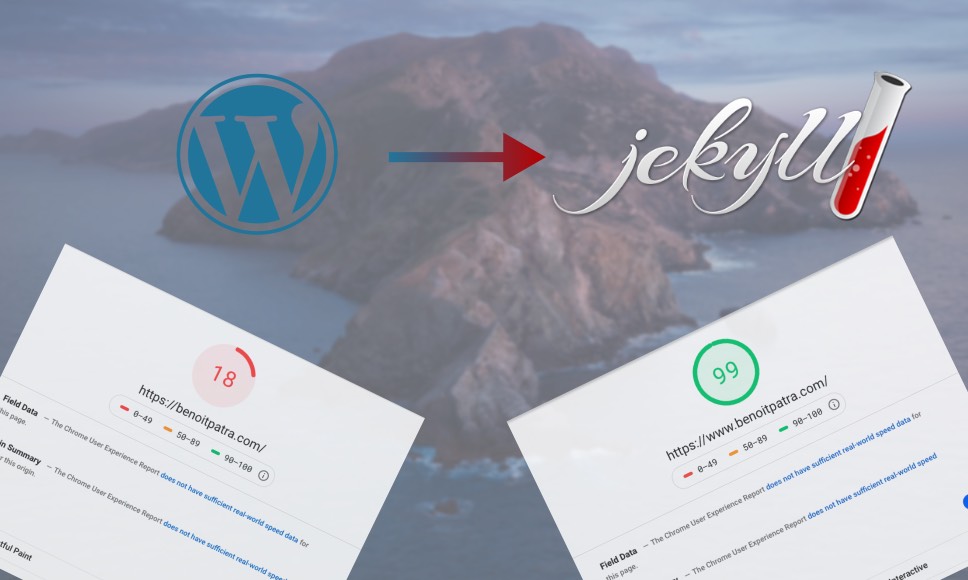
When I started this blog in 2013, I did not want to spend too much time and energy on my blog hosting: I just wanted quick publishing. In those days, the de-facto solution for blogging was Wordpress. I went with a first self-hosted Wordpress.com solution and my first posts were live. I quickly realized that Wordpress was not meant for me and the least I can say is that I regretted my choice. Since then, I always pushed back the effort of migrating away from Wordpress. In the final days of 2020, I decided that I could not continue any longer and migrated my content to a Jekyll solution.
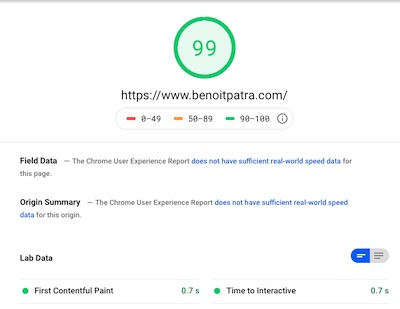
During those years, I tried to mitigate the negative side of Wordpress by changing hosting provider from Wordpress.com to OVH, passing by Azure. Yet this was still a heavy Wordpress solution with a database and all its slowness impacting dramatically speed and consequently, the SEO. For all other projects, I avoided Wordpress and got into Jekyll, one of the simplest static website generator. In fact, I posted in the past about Jekyll. Yet this blog was still under the evil Wordpress. As explained above, I decided that this was enough and I could not bear anymore to write content in a web interface and not relying on version control, which is the very minimum any reasonable developer would want. This transition was not as painful as I thought it would be. In this post, I’ll describe my migration path from an OVH hosted Wordpress to a Jekyll hosted on Azure Static Web Apps leveraging Github actions.
Before starting the description of the steps, let me write a few words about the retained solution: the combo Jekyll + Azure Static Web Apps. Even though new static generators such as Gatsby or Hugo have gained popularity over the recent years. Jekyll is now a mature technology yet still very popular. It is the default templating engine powering Github pages. Moreover, it is definitely a simplistic solution for a basic blog such as this one and I personally know it a lot now. This pushed me again in Jekyll’s arms.
Regarding the hosting solution, I hesitated between a standard Github pages or the new, still in preview, Azure Static Web Apps. Github pages looked to have made some great progress since 2016, when I posted about it and pointed some lack of features for a proper hosting. Now both Azure Static Web Apps or Github pages offer free TLS certificates for custom domains and the caching policy looks ok to me. Finally, I decided to go with Azure Static Web Apps because it is more transparent than a Github pages solution. As explain below, in both cases, I had to rely on advanced build with Github actions, so let us give a try to Azure Static Web Apps.
trl;dr yes that’s another Wordpress to Jekyll migration blog post! But towards Azure Static Web Apps this time.
In the following, I’ll describe the steps for a successful and painless migration.
1. Find a theme on the web
You will not be able to import your theme and visual from Wordpress or at least without some advanced dev work. In the proposed method you will only import into Jekyll the pages and posts content and the visual assets such as images and embedded videos. Therefore, you need to find a new theme that suits you and drop your existing Wordpress one.
Just browse the web and find a Jekyll theme that you like. While it is feasible to get a standard HTML theme and “jekyllized” it afterwards, I suggest you should get a Jekyll template first, especially a blog aware theme. This will spare you some unnecessary dev work. I found mine on jekyllthemes, there are some good free ones but, for a couples of dollars, the paying ones are definitely better. It is definitely worth the cost IMHO.
2. Import your posts from Wordpress
If you are used to the Wordpress world, you know that most problems are (unsuccessfully) tackled by a plugin. I tried to use the Jekyll Exporter plugin, of course that was a failure. So I dropped the idea of exporting from Wordpress and focused on importing into Jekyll.
Then I decided to go with the basic Jekyll importer. Before going into the subtleties of connecting the Wordpress database. Let me point out that Jekyll importer needs some dependencies that may be a little tricky to install. For this reason, I invite you to install Ruby Version Manager (RVM) with Bundler to avoid any troubles with global and/or multi rubies install.
Pro tip: use an SQL Dump and a Dockerized MySQL
To execute the Jekyll importer command, you will need to connect the remote Wordpress database. With OVH hosted Wordpress, database are not accessible directly from the public internet, which is in general a good thing, but here it will prevent you from running the command. My advice is that you should not probably try to modify the settings of the Virtual Private Cloud (VPC) to access this remote database. While it is definitely feasible, it is quicker to use a backup from OVH and mount a local database with it. Then you will use this local replica to run the Jekyll importer command.
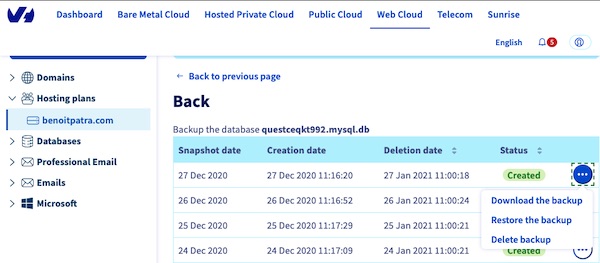
Retrieving an SQL dump is straightforward from the OVH web interface (see capture below). Actually, the backup is a tar.gz file, just decompress and what you have is a basic SQL dump. Rename it to something simpler to type such as backup.dump, you will manipulate just one and you will not need it after running the Jekyll import command.
Then, you can start a MySQL database locally directly using a Docker image. Take a public image of mysql-5.6 (which is the default engine for OVH self hosting at the time of the writing) and start the container with a mounted volume.
docker run -i \
    -p 127.0.0.1:3306:3306 \
    --name mysql-ctn \
    -v /Users/benoitpatra/Code/personal-blog/log:/var/log/mysql \
    -e MYSQL_ROOT_PASSWORD=my-secret-pwd \
    -e MYSQL_GENERAL_LOG=1 \
    -t mysql:5.6
Note: this database will live just the time of running locally the Jekyll import command, you can securely use the root user even with a dummy password.
Just place you SQL dump on your local mounted volume (mine is /Users/benoitpatra/Code/personal-blog/log on my MacOS host). We are now ready to run the command to restore the database from the SQL Dump.
First, run a bash session in the target container:
docker exec -it mysql-ctn /bin/bash
Then in the container restore the database from the dump (enter the db root password, here: my-secret-db).
mysql -u root -p restore-db < /var/log/mysql/backup.dump
Now you have a working database replica of your Wordpress blog locally. You can use it in your Ruby command to run Jekyll importer:
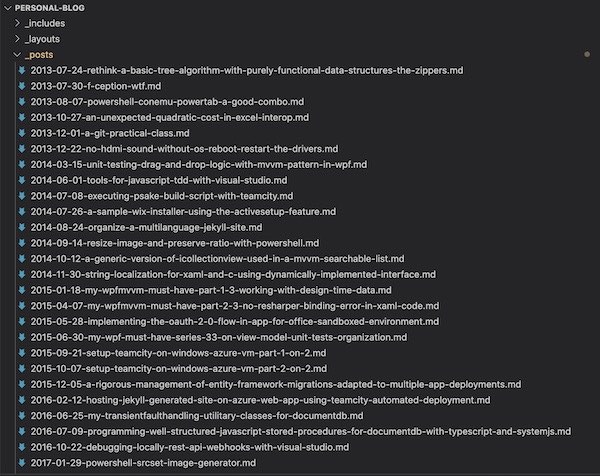
Now you should see under the /posts folder all your existing posts in the markdown format that will be processed by Jekyll. At this stage by running jekyll serve you should see your blog working locally. Yet images are probably missing or pointing to the Wordpress hosted assets.
3. Do not forget to check consistence of URL paths
It is very important that you will not break your existing posts URLs when you will swap your DNS records to make your Jekyll blog live instead of the Wordpress one. Therefore, you must now check that the URL paths of your posts match the ones that you have on Wordpress.
For me there was no difficulty and the generated URLs from Jekyll importer matched exactly the one I had on Wordpress. If you find yourselves in a situation where the URL paths differ, I suggest you check this. Do not forget that, if you cannot find a generic rule to make a systematic match, you can enforce the URL paths of any post or page in Jekyll by using permalink in the front matter.
4. Handle images with FTP and replace Wordpress shortcodes with Jekyll includes
My best advice is to retrieve all your images via FTP (or preferably SFTP). You can use a client such as FileZilla to do so. Once you have fetched all your images locally, you can replace the path directly in the markdown posts.
It is possible that your images have been handled using Wordpress Shortcodes. A good alternative is to create a custom Jekyll include to replace shortcodes with captions and positioning options.
For example, I created the following include that has optional css classes switches handling positioning but also title, caption etc.
Inserting images is as straightforward as shortcodes, just insert image in .md file as follows:
{% include image-caption.html imageurl='/assets/path-to-image.jpg' caption="just insert caption here" position_class="image-center" size_class="medium" %}
5. Use Jekyll archives
If you were using a standard Wordpress blog theme then you probably had a kind of grouping mechanism. This can be traditional Archives listing (grouping by publishing month) but also Categories or Tags. The best way to maintain this is to use a very efficient plugin named Jekyll Archives.
In addition, having an Archives page such as this one is definitely a good idea. Indeed, you’ll want readers to be able to navigate among structured lists and not relying only on post pagination for navigating your blog.
Again you need to check the URLs (e.g. #jekyll) and make sure they will match the ones you had on Wordpress. You may need to use the Slugify Jekyll Liquid filter, in order not to break your URLs.
6. Check SEO best practices with Jekyll SEO tags
I will not delve into all the details of SEO optimization. First and foremost, it is really important is to maintain your canonical URLs for your pages, posts or archives links. For example, mines are https://www.benoitpatra.com/what-ever-the-path-is/.
Note the https protocol, the www subdomain and the last / trailing slash. Ideally, you’ll want a navigation among your pages directly to the canonical URLs to avoid unnecessary redirection. While publishing your blog, you need to know what is the form of your canonical URLs (i.e. the main URL for your content).
All SEO meta content for your pages and post can be generated with the Jekyll plugin Jekyll SEO tag. Actually, such things can be easily crafted by hand with vanilla Jekyll but I found this latter plugin useful because it combines most of SEO meta and spare you some research on best practices (such as searching differences between json+ld, open-graph, twitter-cards etc.).
Again, try to maintain as much as possible all your existing URLs. Do not break URLs and prefer redirection. Remember that Jekyll offers a very simple way to redirect pages and posts thanks to this nice little plugin Jekyll Redirect From.
7. Hosting everything on Azure Static Web Apps leveraging Github actions.
As I mentioned in the introduction, I decided to give a try to Azure Static Web Apps. It worked almost directly out-of-the-box. Because, I am using Jekyll Archives, I could not use the standard (yet opaque) Github pages generation. It seems that there are some workarounds leveraging a custom Github actions build for Github pages. So for both hosting solutions I shortlisted, Azure Static Web Apps and Github pages, I had to rely on Github Actions to build the Jekyll website.
Azure Static Web Apps in its official documentation provides some instructions for deploying and hosting Jekyll website. In addition, I found this post which was also very helpful. After small tweaks, I managed to setup a successful pipeline.
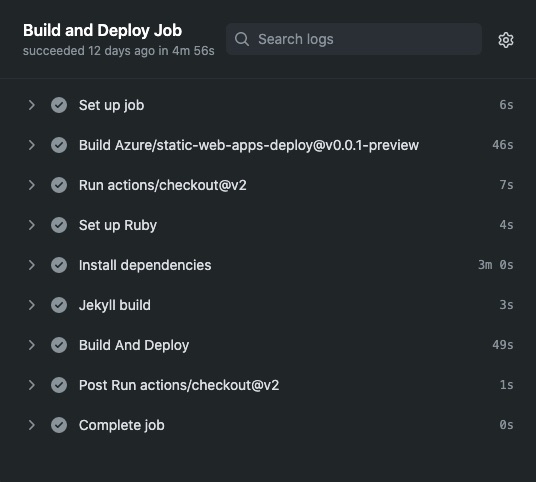
For deploying my Jekyll 4 blog using ruby 2.7.2, here is my Github actions jobs. I just have to git push for my deployment branch (named deploy here) and the website is live after a couple of minutes.
Note that Azure Static Web Apps all the TLS termination but also the http to https redirection and the SSL certificates renewals. In addition, everything is free (at least for now): hosting and CDN. I have been using this service for more than a month now and it seems definitely a good option.
8. Moving comments
I extracted my Wordpress comments to Disqus. I did not want to lose my pasts comments because some of them are definitely valuable. Yet, I am not sure I am going to keep commenting capabilities in my blog in the future… Anyway, the Disqus migration for comments was not complicated. Follow the instruction on the Disqus website. Again, the plugin approach was a failure… I suggest you take the export journey that creates a good old XML archive of your comments that you can reimport later on Disqus. Note that you may wait some hours to see all your comments live and functional.
Conclusion
While the task seemed to be a lot amount of work at first sight, this is not necessarily very complex to get away from Wordpress. Yet, let me be honest: it stays quite time consuming because you will have to go through a lot of small details. Keep in mind that the more your Wordpress site is standard, the easiest your migration path will be. You may need to use your IDE search and replace capabilities, maybe even write some REGEX or some code snippets. For example, I wrote some in Python to get rid of unused assets that I did not want to put under version control. But don’t be afraid, this may not be necessary and at the end this will definitely be for the best.
If your choice leads you to a solution such as Jekyll, do not worry, there will be far less adherence with Jekyll than you had with Wordpress. In other words, if some days you want to move away from Jekyll I guarantee that it will be easier than the path you just took to get away from Wordpress.