
For my build tasks I have been using MSBuild for a while. I found out that it is fine to use it for standard build tasks such as invoking msbuild.exe itself. However, when it comes to really custom actions it is really painful. I did not want to struggle any longer with xml config files and would like to stay as close as possible to a simple procedural programming language. Most of all I was fed up by the quoting issues when invoking external executables. When writing such actions I wanted to stick to a shell scripting language that I already know. Still, basic scripting can be a little bit improved when it comes to build process. To be precise, the notion of task (or target) is extremely handy because you can split a build step in sub tasks that you may combine differently depending on the build config. While it looks like overkill for a small project it will ease your life in large projects where packaging can be complex.
The tool that I will present in this post is called PSake (pronounce saké like the asian alcohol) and is described by the Wikipedia as
a domain-specific language and build automation tool written in PowerShell to create builds using a dependency pattern similar to Rake or MSBuild.
This was all I needed: a build tool in Powershell.
Even if I will not cover this in the present post, one of the main benefit of using Powershell for build scripts is the possibility to use directly Powershell extensions such as Azure or Sharepoint Cmdlets. Even if you do not need it right now, they may become extremely useful in the future of your Windows based software project.
In this post I will describe how to use PSake for a very simple build task: patching the AssemblyInfo.cs file for a visual studio .NET solution. I will also show you the organization of the targets that I have chosen.
Let us recall that the version of the .NET assembly produced by the compilation of your C# project uses the AssemblyInfo.cs file that you can find under the /Properties folder. The lines that are automatically generated in the AssemblyInfo.cs file regarding the assembly version are
[assembly: AssemblyVersion("1.0.0.0")]

[assembly: AssemblyFileVersion("1.0.0.0")]
Consequently, the task has to patch the AssemblyVersion so that it contains major.minor while the AssemblyFileVersion will be major.minor.build. Once the task will be finished all AssemblyInfo.cs in the code source repository will be patched similarly, for example with [assembly: AssemblyVersion("6.3")] and [assembly: AssemblyFileVersion("6.3.567")]. If you are not familiar with product versioning you may read the wikipedia page. Here we chose a major.minor.build sequence where the major and minor numbers are fully handled by the owner of the project. However, the .build number is provided by the continuous integration system which will be Teamcity in our case. Similarly to food industry where, given the number of a ready-made meal you are supposed to be able to track back where the beasts came from, in software, you should be able from the product version to track back the source of your product and its external dependencies. This is why both source code and build history are precious and why the Teamcity database should also be backed up.
The task presented here may not the best advocate for PSake over MSBuild XML configs because using the
Here is the source code for the task.
The outer braces: task PathAssemblyInfo defines the scope of the target. The command does not depend from where the script is run because we use the $PSScriptRoot variable (available since Powershell 3.0). It basically looks for all AssemblyInfo files in the solution directory and patch them with the appropriate version numbers. The detailed implementation of the functions GetAssemblyVersion, GetAssemblyFileVersion and PatchFile can be found here.
Now let us look on how to combine and invoke the PSake targets from Teamcity. I have a /build directory at the root of the repository which looks like
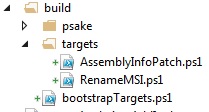
The PSake project is located under the /build folder. In the /targets directory we put all targets where one target equals one file with the same name. The bootstrapTargets.ps1 loads all build targets that are put in the subdirectory with the same name. In bootstrapTargets.ps1 I also put the high level targets, the one that will be called by the Continous Integration. Here, I have defined a high level target Example that executes first our PatchAssemblyInfo then another target that I have called RenameMSI (only for the example). You can also put in bootstrapTargets.ps1 some functions that will be reused by the different targets.
Now see how to invoke the PSake Example task within Teamcity. Create a Powershell using at least the 3.0 version.
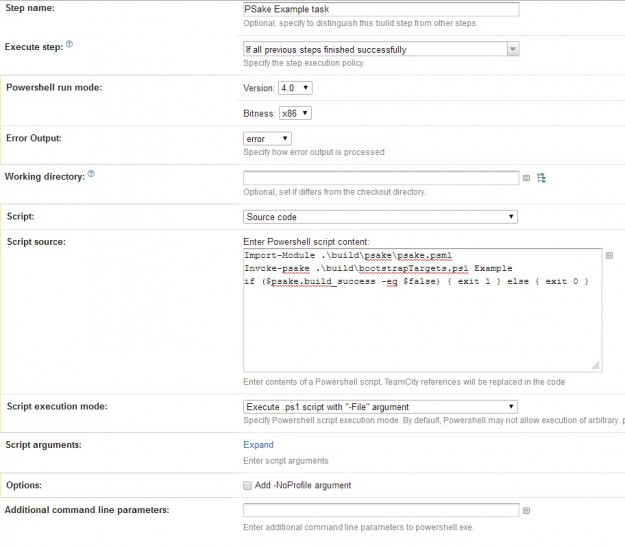
The script in the Teamcity editor (and only this one) assumes the current directory is the repository root. The first line imports the module while second one invoke the Example task using PSake. The third line below is important so that exceptions thrown in the script appear as build failures.
if ($psake.build_success -eq $false) { exit 1 } else { exit 0 }
To conclude, I would say that PSake is good alternative to those who know Powershell and want to use less XML for their builds.